
Tubelights
Light under the Boulroie platform shelters ...
Single-tube lights but there are doubles, too
This was published in Modelspoormagazine 62 - more pictures and text can be found there...
This method to make miniature tubelights was developed after the dual-tubelights method. These lights aren't bad models, but a little to big for some applications. If you don't mind doing some work in advance, these smaller single-tube versions are even easier to construct.
The construction concept is the same: tiny SMD-leds shine their light at alight conducting material, which seems to produce light by itself, but in fact diperses the light. With this method, I used the smaller 1206 SMD’s, measuring a meagre 3,2x1,6x1,2mm.
These SMD's, soldered together and wired, are cast inside a transparent resin using a mould. This means we need a few master models. Each cast model will have the form of a complete tubelight set.
A too complicated short description? Then take a look at the next commented pictures:
|
|

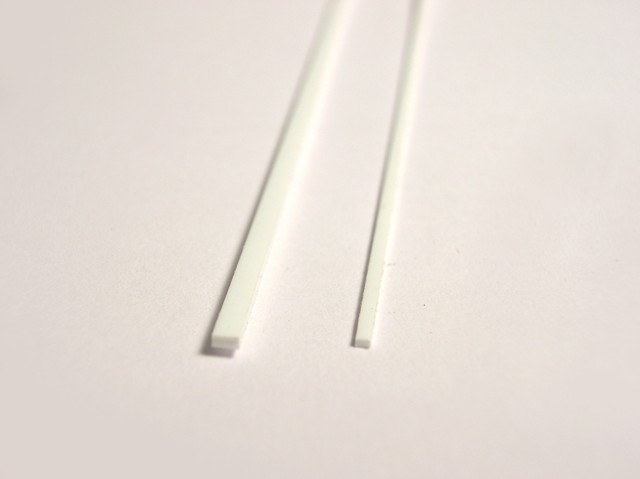
 The two broader strips are glued together to form a square 1,5x1,5mm profile. On top of the glue line, we attach the smaller 0,5x1mm strip. This smaller strip will smlulate the lamp form. |
 This upper strip is shaped to a tublight form using sanding paper. A sharp knife is used to scrape the tube light's support shape. |
 This way, we have ourselves a very long tubelight casing. This shape iscut in 6,5mm lengths. We now have more pieces then needed, but this way we can select the best resembling shapes. |
|

 To solder the SMD's nicely in one line, I made a small tool. A piece of heat-resistant is milled, so a 1,6mm wide and 1,2mm deep gap is formed. In this gap, the SMDs have a tight fit. |
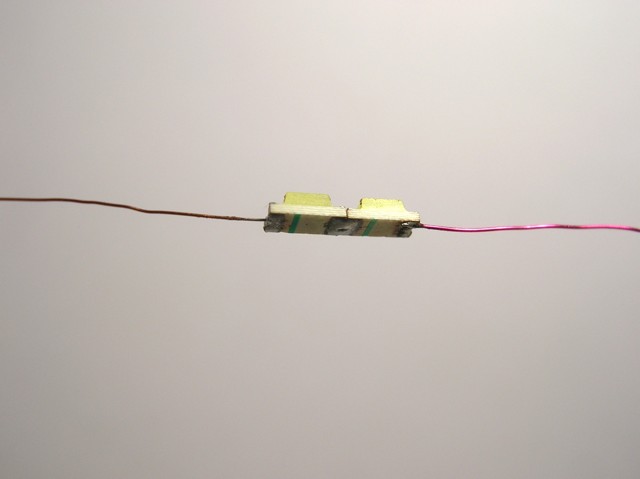 Don't apply to much heat to long while soldering so close to the Led's chip. While they're still in their placeholder, I soldered the thin connecting wires, too. After this soldering, the SMD's are tested using a resistor and a power source. |
 We now use the transparent resin. As this has a longer setting time than common resin, we have enough time to work. We need very little of the mixed product, as each mould opening only needs a drop. Using a small piece of scrap styrene, this drop is spread into the mould. |
|

 After cleaning the cast forms, they're put upside down in a piece of silicon rubber, in which we made some light cuts. The lamp's housing can now be airbrushed while the imitated tubelight is protected from paint. We use a silver paint first, so the inside of the shape will reflect and disperse the SMD's light. |
|

 |
 |
Double-tube lights
This has been published in Modelspoormagazine 58 (april 2007) - more information and pictures can be found in that issue.
 Construction drawing using 2 PLCC-2 leds. |
 These SMD-leds are sold in a special strip. |
 Old diskettes can still be useful. They have just the right dimension for a soldering jig |
 Soldering is done using a tinning fluid and electronics solder. Filing of the connection gives a smooth surface. |
 We use lacque wire, as used in solenoids |
 Mark one wire, as the polarity of the leds has to be recognized afterwards |
 The casing is made of thin styrene sheet. First the bottom, next the two side panels |
 They are cut to the right dimension after the glue has set |
|
 With this little tool it's easy to cut out a tiny rectangle out of a small peace of sheet styrene |

 These parts are then cut and sanded to shape |
 ... and glued to the ends of the casing. |
 Now we have a cradle-shaped armature fot our tubelights. It just needs some fine cutting and sanding to get a smooth surface. |
 No light can shine through the housing, so it is painted black |
 Transparent heat-shrinking tube and thick fiber are the materials we use for the actual tubes. |
 Two pieces of fiber are shifted in a piece of shrinking tube, which is then heated. This way we get an oval sectional shape |
 This is cut to length and glued on top of the leds. |
 The result: a tubeline armature were the tubes seem to light up themselves. |
 Mounted under a station platform ... |
 Using the correct resistor (some experimenting is useful) - we have a very fine result. |
| ©2007 Gerolf Peeters - updated 10.05.2007 | See: semaphores - lanterns - wall-lights |